How to Convert SVG to PNG for High-Quality T-Shirts, Posters & Physical Prints
I'll never forget the box of 200 company t-shirts that arrived for a major conference. In the design mockups, the logo looked sharp and vibrant. But on the actual cotton fabric, it was a pixelated, blurry mess. The sharp vector points had become soft edges, and the specific brand blue had turned into a dull navy. It was a costly and embarrassing lesson in a truth I've seen confirmed countless times in my career: the rules of the screen do not apply to the world of print.
As a developer who has managed asset pipelines for everything from global websites to merchandise production, I've seen where this digital-to-physical translation breaks down. We spend our days optimizing images for 72 PPI screens, obsessing over kilobytes. But when it comes to creating a tangible object—a t-shirt, a poster, a sticker—a completely different set of principles takes over. Simply hitting "Export as PNG" from your design tool is a recipe for disappointment.
This guide is the bridge across that digital-to-print chasm. We'll move beyond web-centric thinking and establish a reliable, professional workflow for converting your infinitely scalable SVGs into high-resolution, print-ready PNGs. We'll demystify the jargon like DPI and color spaces, ensuring that the next time you send a file to a printer, you do it with confidence that what you see on your screen is what you'll get in your hands.
The Core Problem: Why Web Images Fail in Print (DPI vs. PPI)
The single most common point of failure is misunderstanding the fundamental difference between pixels on a screen and dots on paper. This isn't just semantics; it's the core concept that separates amateur results from professional products.
| Concept | PPI (Pixels Per Inch) | DPI (Dots Per Inch) |
|---|---|---|
| Medium | Digital Screens (Monitors, Phones) | Physical Print (Paper, Fabric, etc.) |
| What It Measures | The density of pixels on a screen. A fixed hardware characteristic. | The density of ink dots a printer lays down on paper. |
| The Key Takeaway | A digital image file (like a PNG) only has pixel dimensions (e.g., 3000px wide). The DPI is just metadata that tells a printer how large to print those pixels. | |
Therefore, our goal isn't to find a magic "Convert to 300 DPI" button. Our goal is to generate a PNG with enough pixels to support a high-DPI print at the desired physical size. As we cover in our deep-dive on converting SVGs to high-resolution PNGs for print, getting this right is non-negotiable.
The Foundation: Using SVG as Your Single Source of Truth
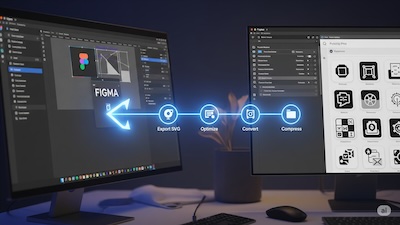
The foundation of any scalable asset workflow, for web or print, is a single source of truth. For any logo or illustration, that source must be an SVG. Because SVGs are vector-based (defined by mathematical paths, not pixels), they are infinitely scalable. An SVG can be used to generate a tiny favicon or a 10-foot-wide banner with no loss of quality.
However, your output is only as good as your input. SVGs exported from design software are often filled with junk code that can cause rendering errors. Before you begin, it's crucial to clean your SVG code before converting. The most reliable way to do this is with a dedicated SVG optimizer, which programmatically strips out the bloat, leaving you with a lean and reliable source file.
A 5-Step Workflow for Perfect, Print-Ready PNGs
With a clean master SVG in hand, we can now follow a precise, repeatable process to generate a perfect, print-ready PNG file.
Step 1: Calculate Your Final Pixel Dimensions
This is where you translate your desired physical size into the digital language of pixels. The formula is simple but essential:
(Print Dimension in Inches) × (DPI) = (Required Pixel Dimension)
Let's use a real-world example. You want a design to be 10 inches wide on the front of a t-shirt. To meet the high-quality print standard of 300 DPI, your calculation would be:
10 inches × 300 DPI = 3000 pixels
This means you need to export a PNG that is 3000 pixels wide. If you send the printer a 500-pixel wide PNG and ask them to "make it 10 inches," you are asking them to perform the destructive upsampling we want to avoid.
Step 2: Convert Your SVG with Precision
Now that you know your target pixel dimensions, you can perform the conversion. A high-quality SVG to PNG converter is essential here, as it allows you to specify the exact output width or height in pixels. You are not just randomly scaling; you are rasterizing your vector to a precise, calculated grid. For a full line of merchandise, a SVG Batch Converter allows you to apply the same sizing rules to dozens of SVG files at once.
Step 3: The Critical Color Space Conversation (RGB vs. CMYK)
This is often the most overlooked step. Your screen creates color by adding light (RGB), while a printer uses ink (CMYK). The range of colors ("gamut") that can be produced by RGB is much larger than that of CMYK. This is why a super-vibrant blue on your screen can look muted and dull when printed.
It's important to know that PNG is an RGB-native format. It does not support a native CMYK color mode. The solution?
- Design with Print in Mind: If possible, use CMYK color values in your design software for a more accurate preview.
- Communicate with Your Printer: This is the most important rule. Ask your print provider how they prefer to receive files. Most modern print shops have sophisticated software that is excellent at converting high-quality RGB PNGs to their specific CMYK profiles.
- Provide the Best Possible Source: Your job is to provide a massive, high-resolution, color-rich RGB PNG. This gives the printer the maximum amount of data to work with. We explore this in our guide to preserving brand colors in PNG conversions.
Step 4: Choose the Right PNG Settings
When exporting, you'll often see options like PNG-8 and PNG-24. For high-quality print, the choice is clear: always use PNG-24. PNG-24 supports millions of colors, which is essential for preserving the nuances of your design. If you want the shirt color or paper stock to show through parts of your design, you must also export your PNG with a transparent background.
Step 5: Final Check and Handoff (Do NOT Compress for Print)
For web development, our final step is always to run images through a PNG compressor. For print, you do the opposite. You want to give the printer the largest, most data-rich file possible. Do not perform any lossy compression, as this throws away color information. Package your final, full-resolution, uncompressed 300 DPI PNG file into a ZIP archive with a text file specifying the intended print dimensions.
Common Pitfalls for Print Production
Even with a solid workflow, a few common traps can catch you out. Here's how to sidestep them.
- Forgetting Bleed: For posters or flyers where the design extends to the edge, printers need a "bleed." This is an extra margin (usually 1/8th of an inch or 3mm) of your design that extends beyond the final trim line. Be sure to include the bleed area in your pixel calculations.
- Using a Low-Resolution Source: The entire workflow depends on starting with a vector SVG. If your source is a 72 PPI JPG or PNG, no amount of conversion magic can create a truly sharp 300 DPI print.
- Ignoring the Print Provider's Specs: Every print shop is slightly different. Before you start, check their website or call them. They will have a technical specifications sheet that tells you their preferred file format and color profile. Their specs always overrule any general guide.
Conclusion: From Digital Blueprint to Physical Masterpiece
Bridging the gap between a digital design and a physical product doesn't have to be a game of chance. By abandoning a web-first mindset and embracing a print-centric workflow, you take control of the process and guarantee a high-quality outcome. The principles are simple but powerful: start with a clean, scalable vector SVG. Use the 300 DPI standard to calculate the exact pixel dimensions you need. Convert your SVG to a precise, high-resolution PNG, paying close attention to color and transparency. Finally, communicate clearly with your print partner.
This repeatable, professional process eliminates guesswork, saves you from costly reprints, and ensures your creative vision is translated into a tangible product with flawless fidelity. It's how you turn your vector art into a masterpiece you can hold in your hands.
iSVGtoPNG Team
iSVGtoPNG Team is a front-end developer and graphics enthusiast with over 10 years of experience in web technologies. She loves exploring the intersection of design and code.