Figma ➜ Flawless PNGs: The Missing Plugin-Free Workflow
I've seen the same story play out on dozens of projects. A talented designer hands off a beautiful Figma file. A developer, following what seems like the most logical path, selects the assets, clicks "Export," chooses "PNG," and moves on. Later, during QA, the feedback rolls in: "The logo looks a bit fuzzy on my new laptop," or "Why is this icon 50KB? It's just a simple shape!"
As a web performance specialist who has spent over 15 years bridging the gap between design and development, this friction point is all too familiar. The immediate reaction is often to search the Figma Community for a "magic" plugin—something that promises "perfect exports" with one click. While some plugins are helpful, they often act as a black-box band-aid, masking the real problem without fixing the underlying workflow.
This guide is the antidote to that cycle. We're going to ignore the plugins and focus on the fundamentals. I'm going to show you the professional, repeatable workflow that I've implemented on large-scale web projects to turn Figma designs into truly flawless, high-performance PNGs. It's not about a secret button; it's about a shift in mindset: stop treating Figma as a PNG factory and start using it as a pristine vector source editor.
The Problem: Why Figma's Default PNG Export Fails
Figma's native export functionality is designed for speed and convenience, not for ultimate quality or performance. When you click "Export to PNG," Figma performs a quick, on-the-fly rasterization of your vector layers. This process, while fast, has several inherent limitations.
- The Resolution Trap (1x vs. 2x): The most common mistake is exporting at the default 1x resolution. On a modern high-DPI ("Retina") display, that 1x image is stretched to fill twice the number of physical pixels, resulting in immediate blurriness.
- The Compression Compromise: Figma applies a standard, "one-size-fits-all" level of lossless compression. I've consistently seen PNGs exported from Figma that can be further compressed by 50-70% using a dedicated tool, with zero loss in visual quality.
- The Vector-to-Raster Betrayal: Any time you convert a perfect mathematical vector into a rigid grid of pixels, you risk introducing subtle artifacts like soft edges. You give up all control over this critical conversion step when you export directly to PNG, which is the root cause of many logo conversion fails.
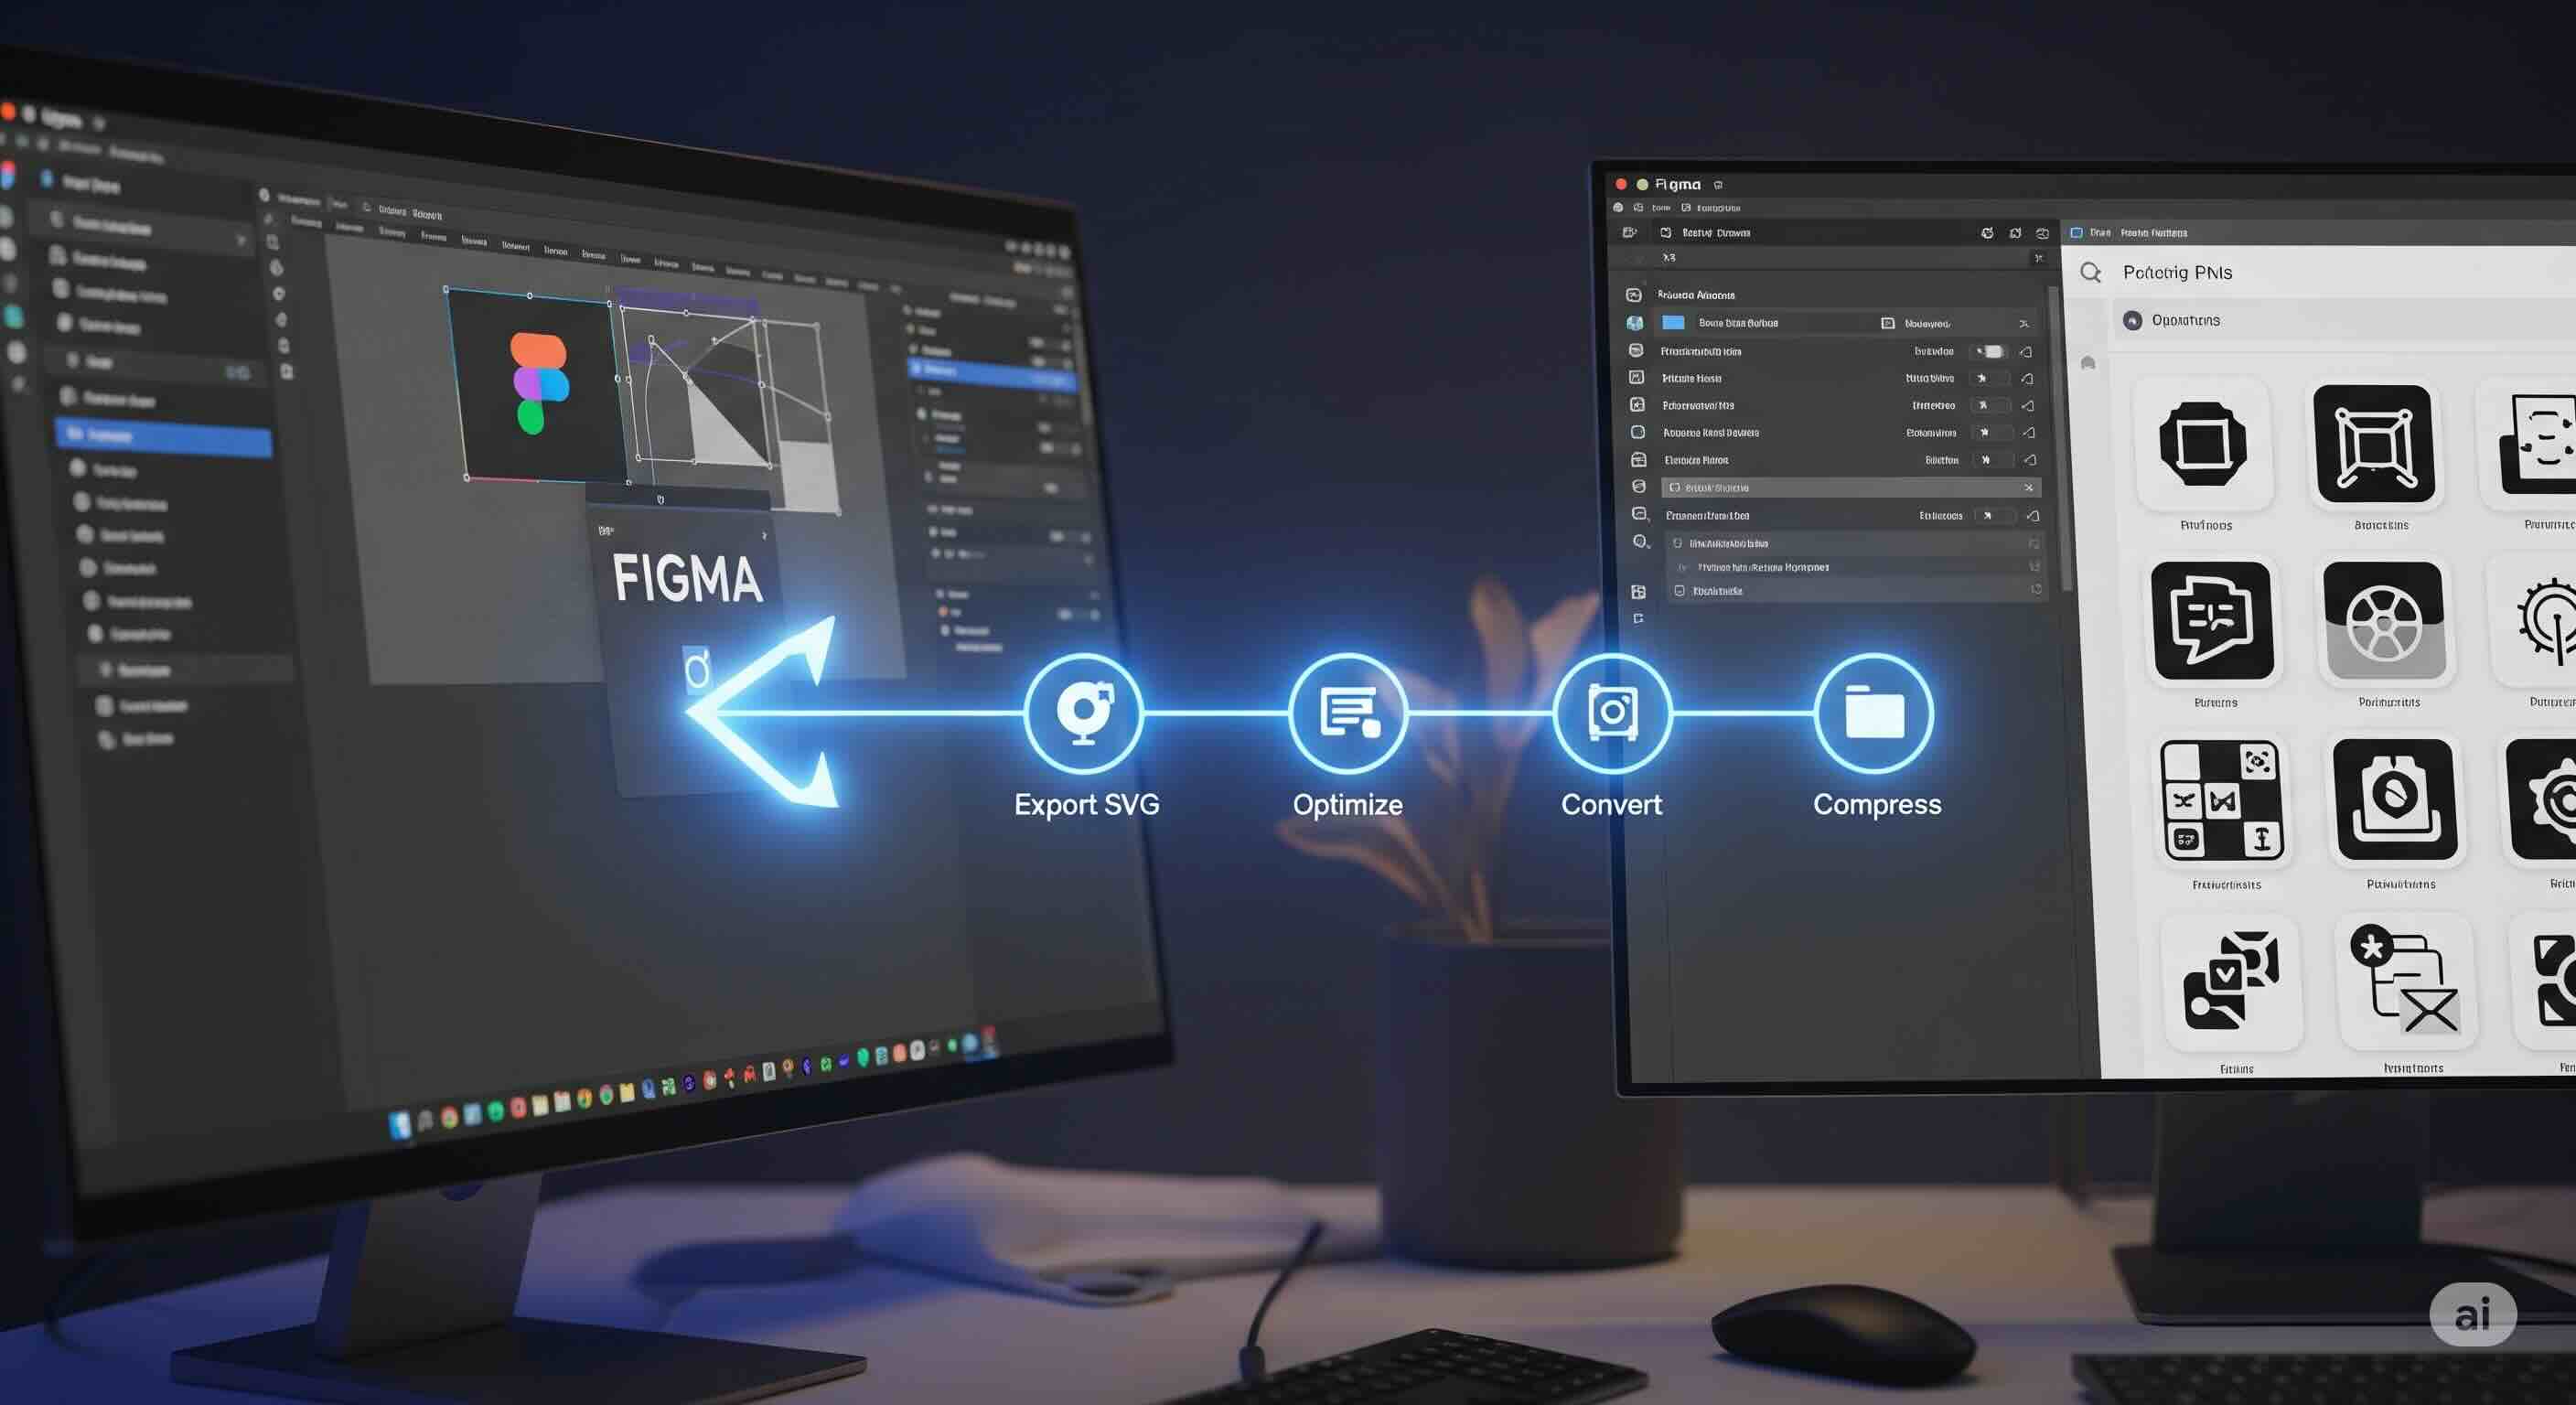
The Professional Workflow: A 4-Step Plugin-Free Guide
The key to flawless PNGs is to take back control. This workflow treats Figma as the starting point for a high-fidelity asset pipeline, not the end point.
| Step | Action | Why It's Critical |
|---|---|---|
| 1. Export SVG | Export a master SVG from Figma, not a PNG. | Creates a perfect, infinitely scalable "single source of truth." |
| 2. Optimize SVG | Clean the SVG code with an SVG optimizer. | Removes junk code and prevents rendering errors in the next step. |
| 3. Convert to PNG | Use a high-fidelity SVG to PNG converter to generate multiple resolutions (@2x, @3x). | Gives you full control over resolution for sharp, high-DPI assets. |
| 4. Compress PNG | Run the final PNGs through a dedicated PNG compressor. | Dramatically reduces file size without quality loss for web performance. |
Step 1: Export the Right Source (SVG, Not PNG)
This is the most critical shift in the entire process. Your primary export from Figma should be SVG. The SVG is your "single source of truth"—a perfect, infinitely scalable vector representation of your asset.
How to do it right in Figma:
- Select your final, flattened asset (a single frame or component).
- In the "Export" panel on the right, choose SVG as the format.
- Click the three-dot menu for more options. Ensure "Outline text" is checked to convert any text into vector paths, guaranteeing it renders correctly.
- Export the SVG file.
You now have a master file that can be used to generate a PNG of any size, now or in the future, without ever having to go back into Figma.
Step 2: Sanitize and Optimize the SVG Source
You might think your exported SVG is ready to go, but it's not. Design tools, including Figma, embed a lot of extra information in the SVG code. This "junk code" can bloat file size and sometimes even cause rendering errors. A dedicated SVG optimizer is an essential, non-negotiable tool in this workflow. As I've covered in a previous deep-dive, this hidden SVG code is a silent killer of asset quality and performance.
Step 3: The High-Fidelity Conversion to PNG
With a pristine, optimized SVG in hand, you are now ready to perform a controlled, high-quality conversion to PNG. Using a professional-grade SVG to PNG converter allows you to specify the exact output you need. The most important setting here is the Resolution Multiplier.
- To create a @2x PNG, set the multiplier to 2.
- To create a @3x PNG, set the multiplier to 3.
This process, known as supersampling, renders the image at a much higher resolution and then scales it down, resulting in incredibly sharp lines. It's the key to automating high-resolution asset creation and achieving that truly "flawless" look.
Step 4: The Final Polish with PNG Compression
You now have a set of beautiful, high-resolution PNGs. The final step is to ensure they are optimized for the web. Run your newly created PNGs through a dedicated, lossless PNG compressor. These tools use more advanced algorithms and can reduce the file size dramatically—often by 50-70% or more—without changing a single pixel.
Scaling the Workflow for Entire Icon Sets
At this point, you might be thinking, "This four-step process seems like a lot of work for a single icon." But the real power of this workflow is unlocked when you apply it to an entire design system. Instead of performing these steps one by one, you can automate the entire sequence. A powerful SVG Batch Converter can handle steps 3 and 4 for hundreds of files at once. This is infinitely faster and more reliable than selecting and exporting each asset individually from Figma multiple times.
Conclusion: From Figma User to Asset Pipeline Master
The path from Figma to a flawless PNG isn't found in a plugin; it's found in a professional process. By abandoning the direct "Export to PNG" button, you reclaim control over the quality, performance, and integrity of your visual assets.
The workflow is simple and powerful:
- Export SVG: Treat Figma as your vector source editor and export a master SVG.
- Optimize SVG: Clean the source code to remove bloat and prevent errors.
- Convert to PNG: Use a high-fidelity converter to generate multiple resolutions.
- Compress PNG: Optimize the final raster assets for maximum web performance.
By adopting this methodology, you elevate your work from simply "exporting assets" to "engineering a high-performance asset pipeline." You ensure that the brilliance of the design in Figma is translated, without compromise, to a flawless experience for every user on every device.
iSVGtoPNG Team
iSVGtoPNG Team is a front-end developer and graphics enthusiast with over 10 years of experience in web technologies. She loves exploring the intersection of design and code.